If you’re new to Outreach and need help connecting LinkedIn, you’re in the right place.
Setting up LinkedIn Outreach Integration might seem confusing at first, especially if this is your first time.
But don’t worry—I’ll guide you through it step by step.
Connecting LinkedIn to Outreach is important. It helps you save time, manage LinkedIn tasks more easily, and keep all your outreach in one place.
In this blog:
- I’ll explain what LinkedIn Outreach Integration is and why it’s helpful.
- Then, I’ll show you a simple step-by-step guide to set it up.
- You’ll also learn how to manage LinkedIn tasks within Outreach for smoother workflows.
By the end of this blog, you’ll know exactly how to connect LinkedIn with Outreach easily and make your outreach process more efficient.
Let’s get started!
Download the Email Deliverability Guide
Outreach LinkedIn Integration Overview

The Outreach LinkedIn integration helps you see LinkedIn information directly in your Outreach platform, combining email and LinkedIn for a smoother outreach experience.
If you use LinkedIn Sales Navigator, you’ll see key prospect details—like job history, shared connections, and recommended contacts—on your Prospect and Account pages in Outreach.
This integration saves time by allowing you to connect with prospects on both email and LinkedIn without switching platforms, making your outreach more personal and effective.
Prerequisites for Outreach LinkedIn Integration Setup
Before you start setting up the LinkedIn integration in Outreach, let's make sure you have everything needed:
Outreach Requirements
- Your Outreach account must support LinkedIn Sales Navigator integration.some text
- This feature is usually available in higher-level Outreach plans.
- If you're unsure about your plan, please check with your Outreach administrator.
LinkedIn Requirements
- You need a Sales Navigator Team or Enterprise license from LinkedIn.
- This license provides access to features like:some text
- Tiles in Outreach that show work history, shared connections, and LinkedIn activity.
- Advanced actions in Outreach sequences for more personalized engagement with prospects.
By meeting these requirements, we can ensure the integration works smoothly. This way, you can use LinkedIn insights directly within Outreach to improve your outreach efforts.
How to Configure Outreach LinkedIn Integration (Step-by-Step)
Integrating LinkedIn Sales Navigator with Outreach brings LinkedIn’s insights directly to your Outreach workflow, streamlining your prospecting with valuable social data.
Step 1: Verify Your License
Ensure you have a Sales Navigator Advanced or Advanced Plus license to access the LinkedIn tiles in Outreach.
Step 2: Access Layout Settings in Outreach
Go to the Account or Prospect profile page in Outreach:
- Click the three-dot menu (Edit) and select Customize Layout.
- If “Customize Layout” isn’t available, clone the layout and set it as default, or check with your Outreach admin.
Step 4: Log into LinkedIn
To activate the tiles:
- Click the prompt in the tile to log into Sales Navigator.
- Return to Outreach and refresh the page to load the data.
Step 5: Arrange the Tiles
Position the tiles in your dashboard for easy access by dragging them into place.
With LinkedIn integrated into Outreach, you’ll have relevant insights on each prospect, making your outreach more informed and personalized.
Download the Email Deliverability Guide
Setting Up LinkedIn Tasks within Outreach
Adding LinkedIn tasks to your Outreach sequence can help you connect with prospects in a friendlier, more personal way.
This feature lets you plan LinkedIn interactions, like viewing profiles or sending connection requests, as part of your outreach routine.
Here’s how you can set it up and use it to build stronger relationships with potential clients.
How to Add LinkedIn Tasks to Your Outreach Sequence
Setting up LinkedIn tasks in Outreach is simple. Here’s a step-by-step guide:
- Create or Open a Sequence – Go to the sequence in Outreach where you want to add LinkedIn tasks. If you don’t have one, you can start a new sequence.

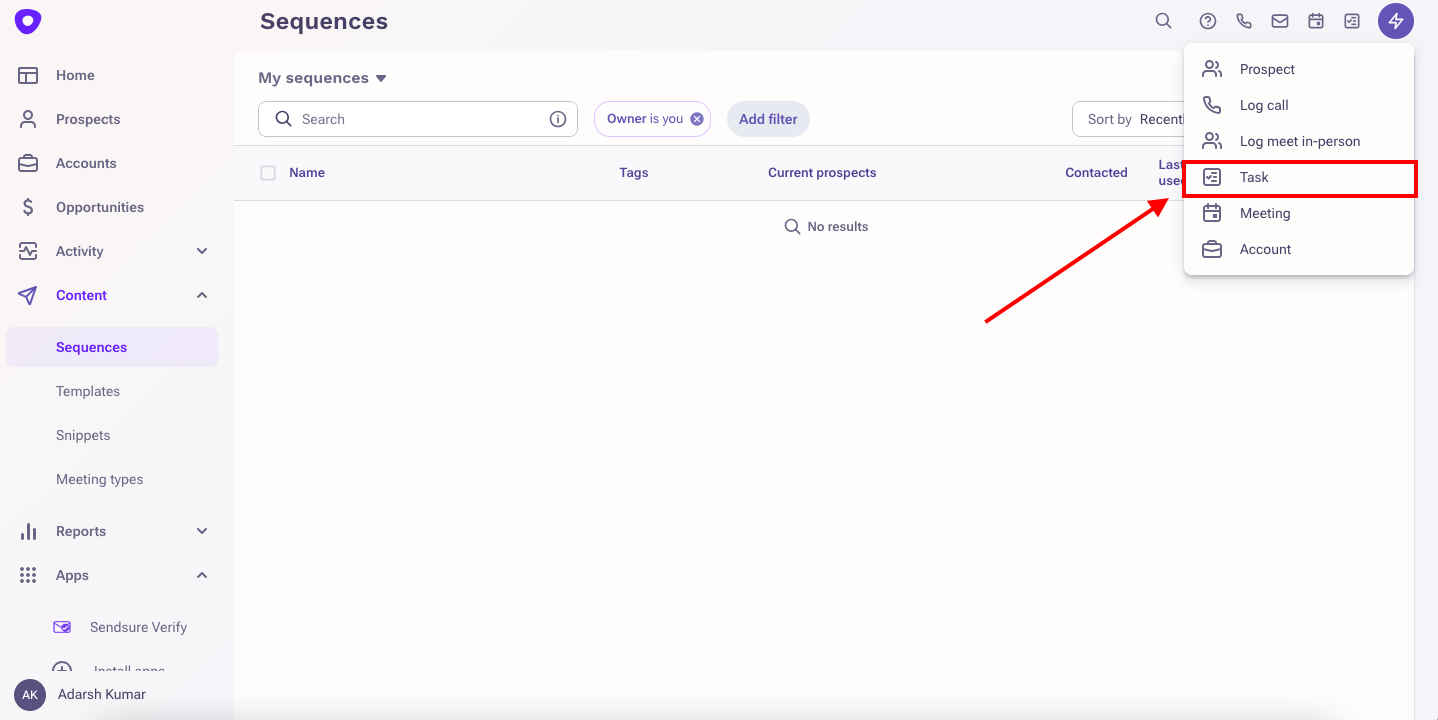
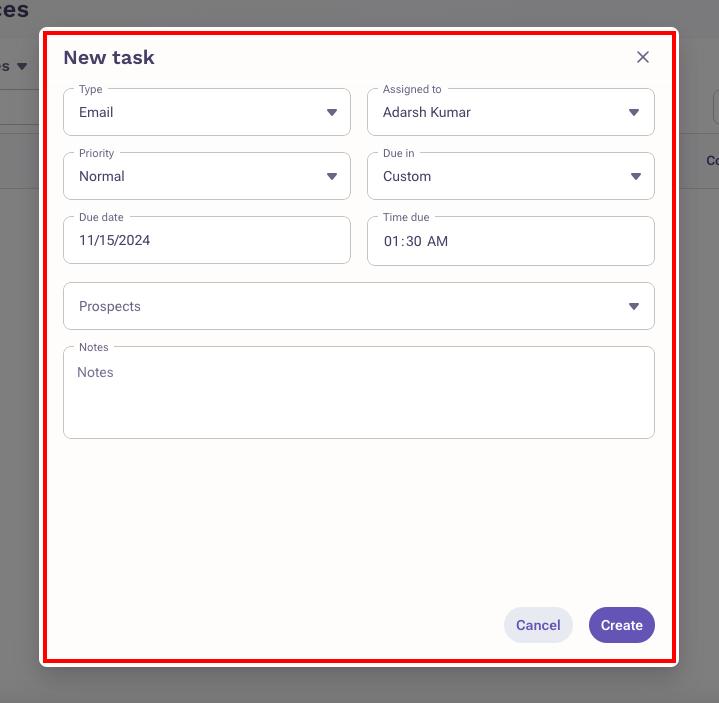
- Add a New Step – Click “Task” in the top right corner of your sequence page.
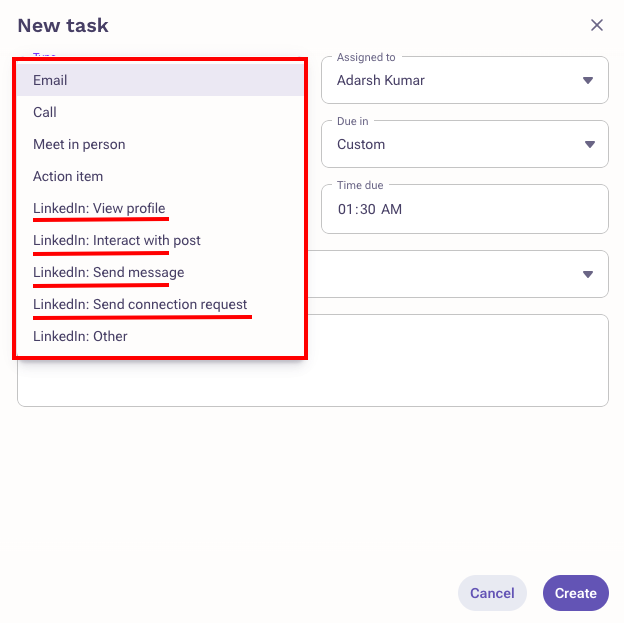
- Choose the LinkedIn Task Type – In the dropdown menu, you’ll find options like:

- View Profile – This task is for looking at a prospect’s LinkedIn profile. They’ll see that you’ve visited, which can create a bit of curiosity.
- Send Connection Request – Use this to send a connection request, allowing you to connect directly with the prospect.
- Interact with Post – Choose this task to like or comment on a prospect’s recent LinkedIn post. This is a friendly way to engage without pushing too hard.
- Send Message – Add this task to send a direct message on LinkedIn. You can use it to introduce yourself and explain why you’re reaching out.

- Organize Your LinkedIn Tasks – After adding the tasks, arrange them in the sequence timeline.
For example, you could start with a profile view, then follow up with a connection request a few days later and maybe a message after they accept your request.
Download the Email Deliverability Guide
Tips for Making LinkedIn Messaging More Effective
Connecting with prospects on LinkedIn is different from email or phone. Here are some quick tips to help you make the most out of your LinkedIn tasks:
- Make Messages Personal – LinkedIn is a social platform, so keep your messages friendly. Mention something specific, like a post they recently shared, to make your outreach feel genuine and personal.
- Mix Different Actions – Don’t send too many messages at once. Instead, try a mix of actions like profile views, post interactions, and messages. This makes your engagement feel lighter and more natural.
- Space Out Your Actions – Give your LinkedIn tasks a few days between each step. For example, you could view their profile on Day 1, send a connection request on Day 3, and like a post on Day 5. This makes your approach feel less rushed.
By following these steps and tips, you can build a stronger relationship that feels natural, making it easier to start meaningful conversations.
Monitoring and Tracking LinkedIn Interactions in Outreach
Tracking your LinkedIn interactions in Outreach helps you understand what’s working. With Outreach’s LinkedIn integration, you can see all LinkedIn activity in one place, making it easier to stay organized and focused.
Key Metrics to Track
- Connection Rates: How many people accept your connection requests. A high rate means your message and profile are appealing.
- Response Rates: How many replies you get to your LinkedIn messages or InMails. This shows if your messaging is effective.
- Post Engagement: How prospects react to your LinkedIn posts. If they engage, it’s a good time to follow up.
By tracking these metrics, you can improve your LinkedIn outreach and connect better with prospects.
Conclusion: Is the Linkedin Outreach Integration Any Good?
This integration makes it easy to connect with prospects on LinkedIn by bringing all of Outreach’s features into one place.
You don’t need to switch between platforms anymore. Everything is simple and works smoothly together.
But even with this integration, it can be hard to make sure your messages reach the right people. Often times, they don’t get seen, which can waste your effort. That’s where SendSure helps.
SendSure is the only solution that supports domain rotation within Outreach.io and SalesLoft.
Why SendSure is Important for Outreach Users

The Outreach LinkedIn Integration helps you connect, but SendSure ensures your messages are delivered.
- Domain Rotation: Keeps your emails safe from spam filters by changing the domains you send from.
- Email Verification: Check if an email address is active so your message reaches the right person.
Start with SendSure today to improve your deliverability. It’s easy to use and helps you get better results quickly!


